Elevation: 11,020 ft
Prominence: 400
This peak is not in the book. Judi Steciak and Carl Hamke provided the following West Face Route information. See their article on the Missing Eleveners in the Climbing History Section of this site. Livingston Douglas climbed a variation of the West Face Route. His route description is found farther down the page. Howard Peak’s lower summit is known as Mustang Peak. Pat McGrane’s Wildhorse Classics Guide provides technical climbing routes up Mustang Peak. You can follow the ridge from Mustang Peak to Howard Peak. For this traverse see Derek Percoski’s route description below. Updated August 2020
Howard Peak is a spectacular Pioneer Mountains peak with two distinct summits. It is located in the Wildhorse Creek drainage on the east side of the Pioneer Mountains. USGS Standhope Peak
West Face, Class 3-4 by Judi Steciak and Carl Hamke
Howard Peak splits the Left Fork of Wildhorse Creek from the Main Fork. It is located just over a mile NNE of Big Basin Peak. From the end of the road in Wildhorse Canyon [(C)(1) on Page 259], cross the Left Fork Wildhorse Creek on a bridge and follow a sheep herder’s trail up the drainage until it crosses to the opposite side of the creek. Continue up the drainage. When the creek doglegs to the east, climb up the slopes north of the creek to the flat meadows below the summit. Climb up one of the gullies that break the west face and do a rising traverse to the saddle just south of the summit. Contour out on to the west face and climb up a series of sloping ledges to the summit.
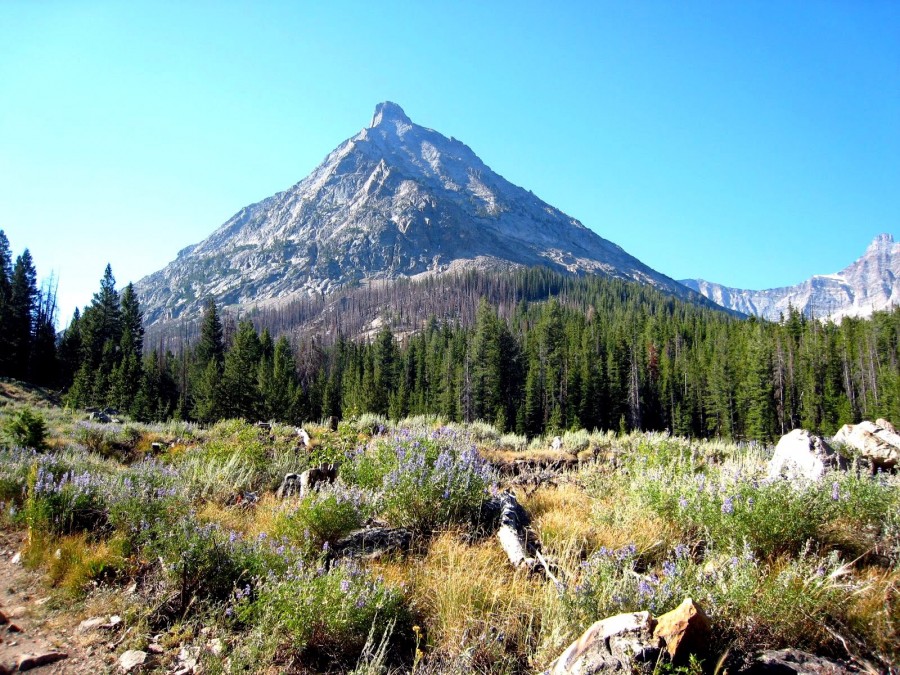
Howard Peak. George Rienier Photo

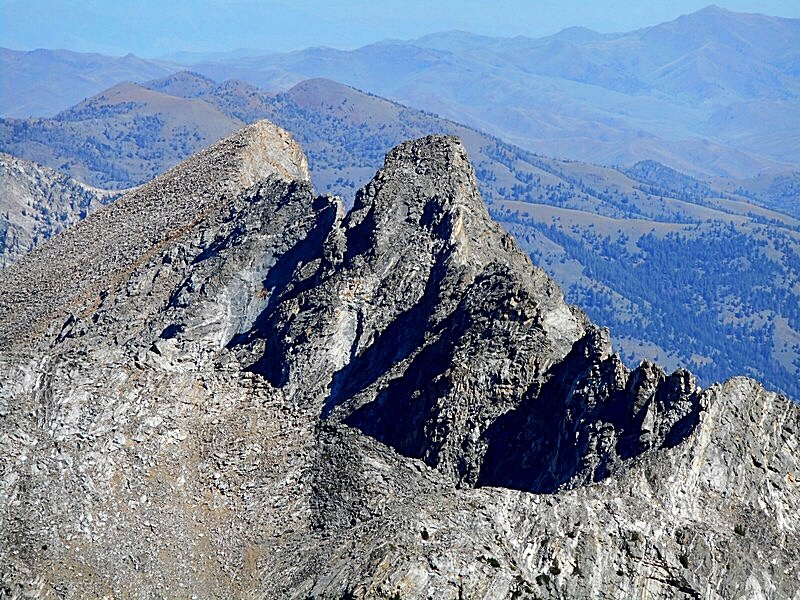
Ascending Howard Peak on nonstop steep slopes. George Rienier Photo
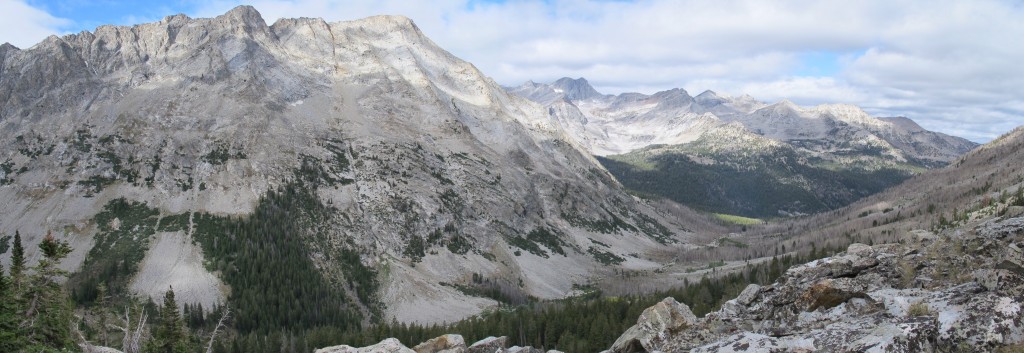
Howard Peak (left) and Mustang Peak (right) as viewed from the north slopes of Brocky Peak.
West Face–Douglas Variation, Class 3+ by Livingston Douglas
Access
Via Wildhorse Canyon Road/FSR-138. Either park at the Wildhorse Campground (7,320 feet) and hike, or drive up the 4WD road approximately 3-1/4 miles to its end at a large parking area (7,860 feet). The 4WD road is gated and closed to motor vehicles beyond this point.
The Climb
This route is mostly Class 2 (surprisingly) with two short Class 3+ moves up near the summit. Hike up the 4WD jeep road briefly until you see an unmarked trail that goes straight where the road takes a sharp left turn. This excellent climber’s trail is shown on the Salmon-Challis National Forest map but is not shown on the Standhope Peak quadrangle.
The trail begins approximately 200 vertical feet above the large parking area. It won’t take you long to reach it, so be vigilant in looking for it because it is critical in crossing the Left Fork of raging Wildhorse Creek. The trail tops out at approximately 8,100 feet and drops to cross the Left Fork on a sturdy log footbridge that is equipped with an equally-sturdy wooden handrail on the upstream side of the footbridge. You do NOT want to lose your footing on this bridge, as a fall into the Left Fork would be catastrophic. It is a narrow, powerful, raging inferno–even in the middle of summer. This crossing is about 1/4 mile above the confluence of the two forks of Wildhorse Creek (i.e., the Left Fork and the Main Fork).
After crossing the footbridge, continue up the trail as it traverses across a forested shoulder (which is actually the north ridge of Howard Peak) then climbs southwest, following the east side of Wildhorse Creek. Leave the trail as it bends southeast (at 8,700 feet). Note: this is an earlier trail departure than that used by Steciak/Hamke. Bushwhack eastward up through a slab boulder-and-pine forest mix. Be careful to avoid getting blocked by house-sized boulders and boulder-cliffs early on. The slope eventually eases, the massive boulders disappear, and the bushwhack becomes more manageable. You will reach tree line and a gentle tundra basin at the base of the west face of Howard Peak in about 1/2 hour. The tundra basin is just below 9,600 feet.
Now you have an excellent view of the west face of Howard Peak. It is steep and intimidating. You might just be “quaking in your boots,” as they say. How the heck can this be a Class 3-4 climb? Oh, but it is. It’s not even that bad. Sometimes, looks are deceiving. It’s now critical to identify which of the summit humps is the true summit. Of the two humps that appear highest (and appear to be of equal height), the L/N one is the true summit. Now you can identify the correct gully that you must climb higher up to gain the summit ridge just right/south of the true summit. If you come up on the left/north side of the true summit, you’ll be sitting at the base of a very steep, impenetrable face. Don’t make that mistake.
The west face appears to be just a steep face, not a menagerie of small gullies and aretes. But, once again, looks are deceiving. There are small gullies and aretes on this face, as you are about to find out. When looking upward at the face, left-of-center is easier than right-of center. There is an imposing cliff band/headwall that is low on the face and appears to be impenetrable. Begin climbing the West Face by ascending a gully in the center of the face, heading straight up from the tundra basin (you can identify this gully on the USGS quad). Scramble up the gully then move rightward onto a shoulder of scree/talus to get close to the initial headwall. Do a diagonal upward traverse leftward up a ramp of scree/talus to get past this headwall.
After this brief leftward foray, climb upward and to the right to get back into the center of the face. You will soon work your way up a small gully then rightward onto an arete. Once on this arete, you will see a huge gully of bedrock in the center of the West Face. Move rightward to enter this bedrock gully and follow it upward for 500 vertical feet. Well, as the saying goes, “all good things must end.” And this wonderful bedrock gully is about to dead-end at an impassable headwall. Move rightward onto an arete and you will discover the upper gully that you’ve been waiting for: the gully that will lead you to the summit ridge at the desired notch just south of the summit.
Climb this final gully about 220 vertical feet upward to reach the summit ridge. This final gully is a mix of loose talus and scree, but goes at a Class 2. Unbelievably, this climb has been entirely Class 2/2+ to this point. Where is the Class 4 stuff? Just below the summit ridge, you will skirt below and to the right of a nasty, cliffed arete that extends down from the summit itself. You will now emerge on the summit ridge at 10,900 feet on a small saddle between two summit humps, both of which are climbable. Follow the ridge northward staying on, or just L/W of, the ridge crest. There are two Class 3+ moves required in this section, but most of this final section is Class 2. I don’t recall any “ledges” when climbing this final ridge. You’ll soon emerge on the small, rocky perch that is the summit of Howard Peak. The high point is a large boulder. From the summit, you have an outstanding view of the Wildhorse Creek Valley, with rugged peaks lining both sides of the valley as you gaze northward. This is a mountaineer’s dream. And it really wasn’t too difficult to get up here.
Descend the west face to the gentle tundra basin at the base of the face. From here, let’s try an alternate descent route to avoid the massive boulders and boulder-cliffs that are hidden in the forest that we ascended earlier in the day. Seeing tents up at Arrowhead Lake, it’s logical to presume that the climber’s trail continues all the way up Wildhorse Creek to Arrowhead Lake. Descend in easy, open terrain (mostly tundra) in a SSW direction down to Wildhorse Creek, which is barely a trickle up this high up. Unfortunately, there is no climber’s trail here. The wonderful, open terrain quickly gives way to the thick forest that surrounds the Wildhorse Creek drainage. Bushwhack downstream to intercept the climber’s trail. Follow the right-hand side of the creek and bushwhack through lots of blowdown and vegetation, in addition to steep areas of descent. Thankfully, the pain doesn’t last for long as the distance involved is only about 0.5 mile until the climber’s trail appears. Cruise down the climber’s trail back to the large parking area at the end of the road.
Howard-Mustang Traverse, Class 3 by Derek Percoski
The connection from Howard to Mustang is fairly easy to make. You just need to downclimb Howard’s summit block the same way you came up, then circle around it on the west side. As you start heading north there is a large slab on the face. You can pass above it on a narrow shelf or downclimb a bit more to go below it. The crux off the connection is downclimbing Howard’s summit block (on the south). Some have called this Class-3+ because there’s one small section of scrambling up top with mild exposure. The link-up between the peaks is Class 3, with almost all of it being Class-2. There is no summit “block” on that side of Mustang—the ramp goes all the way to the top.
When I left the summit of Mustang, I started down the rugged Class 2 route then quickly took notice of the gully that cuts down the northwest face (Class 4+). It looked doable so I couldn’t pass up the challenge. The top involved very complex route-finding on steep slabs that made for a satisfying endeavor. It’s not a route that I regret, but not one that I would recommend either.
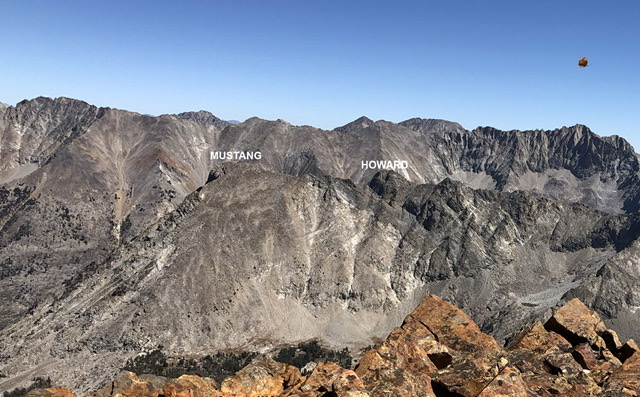
Mustang and Howard, taken from Old Hyndman saddle. The southwest slopes are on the left side of the photo. Derek Percoski Photo
Additional Resources
Regions: EASTERN IDAHO->Pioneer Mountains
Mountain Range: Pioneer Mountains
First Ascent Information:
- Other First Ascent: West Face Route--Douglas Variation
- Year: 2016
- Season: Summer
- Party: Livingston Douglas
Longitude: -114.087 Latitude: 43.7532