Elevation: 11,332 ft
Prominence: 312
Climbing and access information for this peak is on Pages 285-286 of the book. Please note that this peak is erroneously named Triple Peak in the book. Access to Lower Cedar Creek and travel up the drainage has significantly changed since the book was published. Thanks to Livingston Douglas, we now have updated, detailed west side access information and a more detailed route description for this impressive peak. Kieran Balazs climbed the peak from Upper Wet Creek. The detailed trip report for his Class 2 route is linked below. Updated September 2021
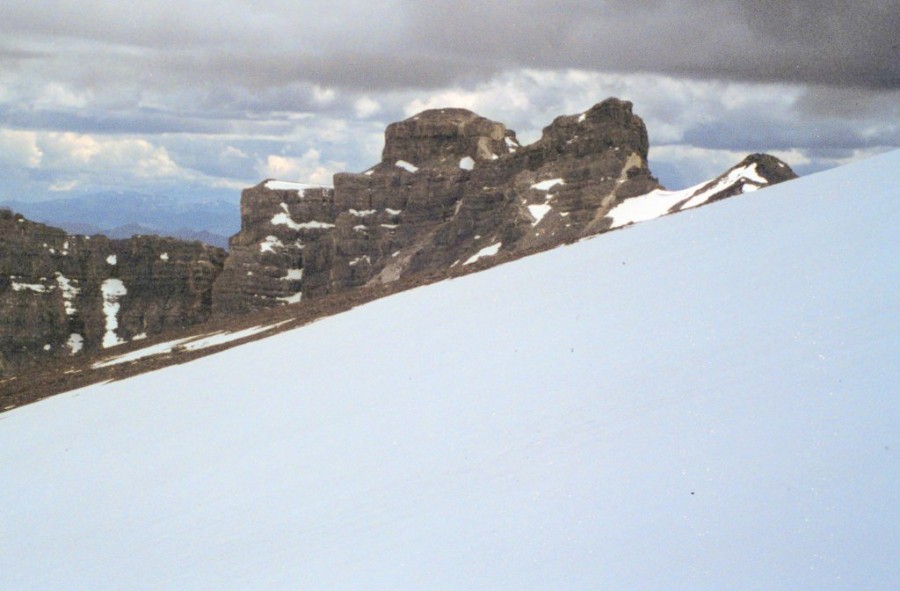
Limestone Peak is the highest of four impressive peaks (Limestone Peak, Ross Peak, Octoberfest Peak, and Peak 11260) that surround the headwaters of Wet Creek. With its chiseled lines, Limestone Peak is one of the most unique-looking Idaho summits. It would look at home in Glacier National Park or the Canadian Rockies. USGS Massacre Mountain
Contents:
(1) Updated access information and Southwest Ridge/South Ridge by Livingston Douglas
(2) Brian Orth/Toni Orth Southwest Ridge Route, and
(3) Steciak/Hamke Southwest Ridge Variation Route.
(1) Access Update and Southwest Ridge/South Ridge Route by Livingston Douglas
Access
Lower Cedar Creek Road and Cross-Country Route [(B)(13)(a)] modified as follows due to access issues on Lower Cedar Creek Road. From the intersection of US-93 and Main Street in Mackay, drive northeast on Main Street for 0.5 mile, where it intersects the Bench Road. Turn right/southeast onto the Bench Road. You will quickly reach the entrance to the McCaleb Cemetery. Pay your respects and reset your odometer here.
There are two BLM roads to consider when attempting to reach the mouth of Lower Cedar Creek Canyon. They are both located along the Bench Road southeast of the Cemetery entrance. The first road, which I will loosely call “The Recycling Road”, is located exactly 0.7 mile southeast of the Cemetery entrance. The second road (Lower Cedar Creek Road) is well-marked and is located 1.3 miles southeast of the Cemetery entrance. Lower Cedar Creek Road is the standard route used to reach the mouth of Lower Cedar Creek Canyon.
Unfortunately, this road is closed to public access at the 1.2 mile point. At this private property closure, there is a spur road going right, crossing Lower Cedar Creek, then going north for 1-1/2 miles where it ends. This spur road is very rough and it would be difficult to navigate with a passenger vehicle; it is best used by ATVs. You can hike the spur road (to get around the private property), but it’s a long hike to the mouth of Lower Cedar Creek Canyon from here. There is a shorter, much better alternative which is drivable by passenger cars and does not involve dangerous creek crossings. It’s the “Recycling Road.”
I discovered this road in a desperate attempt to find a way to get closer to the mouth of Lower Cedar Creek Canyon. From the Cemetery entrance, drive 0.7 mile southeast on the Bench Road to reach the fenced-in recycling center (located on the left/northeast side of the Bench Road). Just past the recycling center, you will cross a cattle guard. Immediately after the cattle guard, you will see a dirt road heading north (directly at Lower Cedar Creek Canyon). This road begins by following the east side of the large fence that encloses the recycling center. Consequently, I deem it “The Recycling Road.”
The Recycling Road is shown on the Mackay quadrangle. At the base of the road, set your odometer to 0.0. Drive north up this road. Immediately after passing the recycling center, the road does a dogleg left then a dogleg right soon after that. There is a road junction at 0.7 mile, go straight (not left). At 2.4 miles, the road crosses the power lines (and the power line road). At 2.5 miles, the road crosses a cattle gate. At 2.7 miles, the road reaches Nielsen Ditch (6,680′). Park here unless you have a high-clearance vehicle that can safely navigate the large berm on the south side of the ditch. If you have a high-clearance vehicle, you can drive another 0.3 mile to where the road is blocked by a cattle fence.
From the parking pullout at Nielsen Ditch, put on your sandals and wade across Nielsen Ditch. Don’t worry, it’s not too deep but it’s too wide to leap across, unless you’re an Olympic long-jumper. After crossing Nielsen Ditch, stow your sandals and put on your hiking boots. Hike up the road for 0.3 mile to a road closure at an east-west cattle fence. Lower Cedar Creek Ditch crosses here, just on the other side of the cattle fence. There is another cattle fence that goes N-S from here. At the corner of the two fences, there is a sturdy section of split-rail, log fencing that you can easily climb over and use to cross Lower Cedar Creek Ditch without getting your feet wet. You’ll have some willows to fight with here, as they intermingle with the fence and just love that creek water.
Once past Lower Cedar Creek Ditch, follow the old jeep road as it follows the east side of fence row. The old road soon fades away, so just keep following the fence row on easy, relatively-flat sagebrush terrain for 1/4 mile where you’ll reach yet another ditch (this one is unnamed). At this ditch (which is easy to jump, as the stream is small if not nonexistent), you must make a decision. If you plan to climb Little Mac or Mount McCaleb, turn left/northwest here and hike along an old jeep road that follows the northeast side of the unnamed ditch and, in about 1/2 mile, reaches the jeep road that runs along the base of the mountains. Please consult the South Ridge Route for Little Mac for more details.
If you plan to hike up Lower Cedar Creek Canyon (as we are), you are now in open terrain since the fence row made a left turn and now follows the southwest side of the unnamed ditch. Hike NNE directly up this gentle bench through sagebrush, aiming for the left/west side of the canyon mouth. In just over 1/2 mile, you will reach the mouth of Lower Cedar Creek Canyon. From your parking spot at Nielsen Ditch, it’s just over a mile to the mouth of the canyon, hiking on easy, open terrain. For couch slugs, that might be a bit too much, but not for you.
Follow an old, unused jeep track that descends down the left/west side of the canyon and intersects the [very good] hiker’s trail on the left/west side of [raging] Lower Cedar Creek. Mark this intersection with a cairn, as it will be easy to miss when you come back down the trail later in the day. From the high point on the bench at the mouth of the canyon, you dropped 100 feet in elevation to reach the trail and you’ll have to re-climb that 100 feet later in the day on your “descent” back to the bench.
This well-beaten trail is narrow and is not shown on either the NFS map or the Mackay quadrangle and it is not mentioned in the Lopez book. I heard about it when I spoke to the folks at the NFS office in Mackay. The trail leads up to a magnificent waterfall that pours out of a large cave entrance above the trail. It will make your life immeasurably easier (than bushwhacking), at least for a little while.
Hike up the trail for 1-1/2 miles to an excellent footbridge that crosses to the right/east side of Lower Cedar Creek. To reach Limestone Peak (via the Steciak/Hamke route) from here, you have a choice. Continue up the trail, gaining about 200 feet in elevation, to where the trail ends below the impressive waterfalls then bushwhack your way up the right/east side of Lower Cedar Creek (but, to get back to the creek, you’ll have to drop 150 feet in elevation) OR bushwhack up the narrow, thick creek drainage. I did the former on my ascent and the latter on my descent. Neither option is very appetizing, but it is necessary in order to reach easier ground farther up the drainage.
The good news is that Lower Cedar Creek is half the size it was before you crossed the footbridge (since the feeder stream coming down from the waterfall joins Lower Cedar Creek BELOW the footbridge). Even better news is that the now-manageable creek will soon disappear entirely and the creek bed will go dry, as the remaining creek is fed by a powerful spring on the right/east side of the creek drainage. I discovered the creek’s source on my unpleasant bushwhack back down to the main creek bed on my ascent.
Once you reach the dry creek bed, bushwhack your way up the drainage and follow the Steciak/Hamke Route. The bushwhack isn’t too awful in this dry creek bed area, though there are some occasional brushy areas to contend with.
Southwest Ridge/South Ridge, Class 3 (Douglas Variation of the Orth Route)
Bushwhack your way up the Lower Cedar Creek drainage to tree line at a prominent fork in the drainage (8,200 feet). Continue straight up the main fork (north); do NOT go up the East Fork. Scramble up talus to enter the upper reaches of the Lower Cedar Creek drainage. You will have to climb up through multiple strata of nasty rock bands and drippy waterfall sections (all surprising to me). After a section of shale ledges and notches, you will reach calmer terrain just below Tarn 9880. The cirque above Tarn 9880 is NOT a bunch of cliff bands (as the USGS map suggests); it is actually a series of faces and minor shoulders of scree (this was another surprise).
From Tarn 9880, you can climb directly to the small saddle between USGS Peak and Limestone Peak (the Orth Route) but it gets quite steep and has much loose scree. A safer alternate route is as follows. The terrain discussed here is identifiable on the USGS Massacre Mountain quadrangle, which you should carry with you for reference. Immediately past Tarn 9880, scramble north up a gully that soon bends northeast then north then northwest and takes you to the southwest ridge of Limestone Peak at 10,900 feet. The final section of this gully climb follows the right side of a sub-ridge that joins the southwest ridge at a flattish ridge joint at 10,900 feet. It has been a Class 2 scramble to this point.
From this junction on the Southwest Ridge, follow the Steciak/Hamke Route to the summit. The southwest ridge is rocky and has serious exposure on its left/northwest side. But the ridge is decent shale, with a few minor rock strata to circumvent. The south summit is a huge block of rock (shaped like a courthouse) with angled ledges below it and deadly exposure on its west and northwest aspects. It is impossible to climb over it. You must traverse upward across the wide, scree-covered ledge below the cliffs of the south summit to get around this false summit to reach the saddle that separates the south summit from the true summit (the north summit).
This ledge traverse is the crux of the climb. It is exposed, angled, and has treacherous footing. The best (least-angled) footing is, unfortunately, right next to the western edge of the ledge. A fall here would be catastrophic. Do not take this section lightly; be very careful. Thankfully, the ledge traverse goes quickly and you work around to the safer, less-exposed northwest face of the south summit. Traverse across it to reach the [blessed] ridge saddle. It is then quick work up Class 2 broken shale on the south ridge to the north summit.
(2) Orth Route, Class 3 by Brian Orth
Follow the directions to the beginning of Lower Cedar Creek Canyon, the same as if you were climbing USGS Peak from this direction. Instead of heading into the gully for USGS at 8,600 feet, continue climbing toward the tarn at the head of Lower Cedar Creek. Around 9,600 feet, some cliff bands block the way into the upper portions of this unnamed basin. Pass the first two on the right/east side, then head right/west, climbing the next cliffs over breaks and cracks. Once near the tarn, look for a game trail heading across the scree field. Make your way to this game trail.
This trail will fade after a while, but the footing is good all the way to the ridge line above (10,800 feet). Once on the ridge line, climb towards the rounded point south of the peak. Around 11,200 feet, look for another game trail that cuts north on top of a cliff band, around to a flat saddle between Peak 11332 and its southern neighbor. This is the trickiest part of the climb as the talus is steep, and a fall would send you down a long way. Eventually you’ll make your way to an arch which you can easily skirt. Once on the flat, round saddle, climb the easy ridge to the summit.
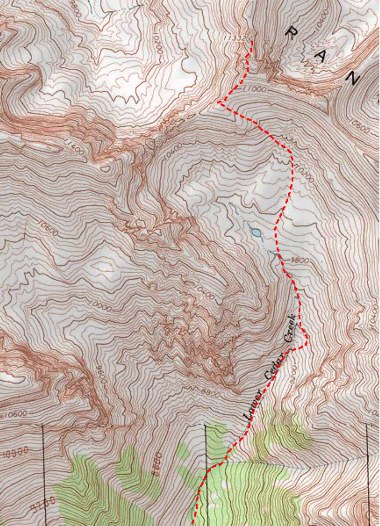
Route map of the upper route (approximate).
Limestone Peak as viewed from its southern neighbor.
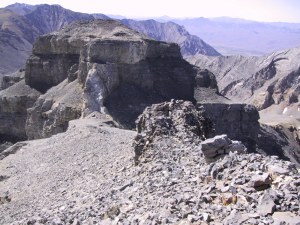
Looking south toward Lower Cedar Creek.
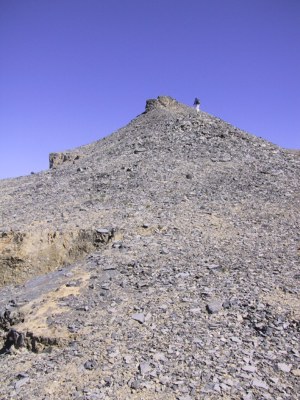
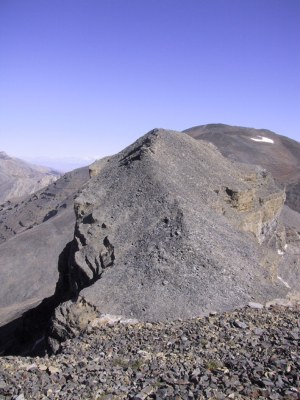
The last bit of ascent.
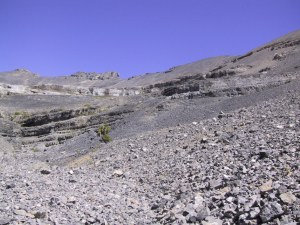
Showing the cliff bands in the lower drainage that can be passed on the right.
(3) Steciak/Hamke Route, Class 2-3 by Judi Steciak
Limestone Peak is located 1.5 miles ENE of USGS Peak. The route up the south ridge can be reached by a long walk up Lower Cedar Creek [(B)(13)(a)] to the saddle on the connecting ridge to USGS Peak (labeled McCaleb on the USGS topo map). Head NE up the ridge until you can contour west around to the saddle between the north and south summits on a large ledge at ~10,200 feet. The crux is a short but somewhat-exposed move across a rib of white rock to get to this saddle. Follow the south ridge to the summit.
Additional Resources
Regions: EASTERN IDAHO->Lost River Range
Mountain Range: Lost River Range
First Ascent Information:
- First Ascent Year: 2001
- Season: Summer
- Route: Orth Route (Class 3)
- Party: Brian and Toni Orth.